How to set up parameters when using Radiolink AT9S control glider
This user manual is compatible with the model F3K, such as CX5, VISON, STIKA, and STEAM
The products for this manual are:
Transmitter: Radiolink AT9S Pro/AT9S/AT9
Receiver: Radiolink R6DS
Glider: STEAM
Step1: firmware upgrade
Attention: The V1.8.2 firmware is designed for gliders. If your plane is a glider, you must change the firmware of your transmitter to V1.8.2, even the default firmware is V2.0.2 or you have upgraded the firmware to the latest firmware V2.1.0a before.
https://www.radiolink.com.cn/at9spro_firmwares
Step 2: Reinstall the switches
Interchange the SWH and SWF first to make the control more convenient (you have to change the position of the SWH and SWF first if you are accustomed to holding on the transmitter by left hand and throwing the glider by right hand).
Step 3: Connect the receiver and servos
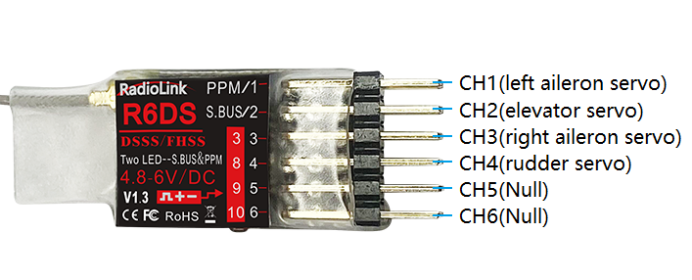
Make sure the receiver R6DS is outputting PWM signal (it means the R6SM is outputting PWM signal when it with red LED always on)
R6DS | DLG Glider |
CH1 is Aileron | Connect to the left aileron servo of DLG |
CH2 is Elevator | Connect to the elevator servo of DLG |
CH3 is Throttle | Connect to the right aileron servo of DLG |
CH4 is Rudder | Connect to the rudder servo of DLG |
Please click our official website to check the user manual of R6DS.
https://www.radiolink.com.cn/r6ds_manual
Step 4: Parameter setup in transmitter
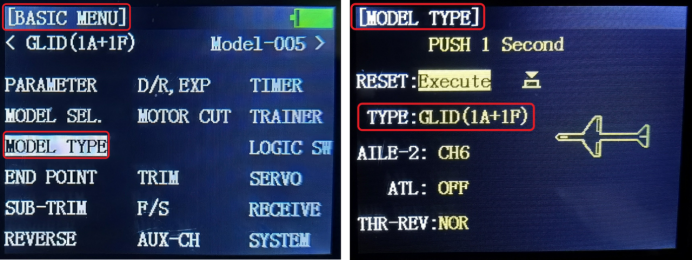
1. Into BASIC MENU—select MODEL TYPE menu—select GLID(1A+1F)

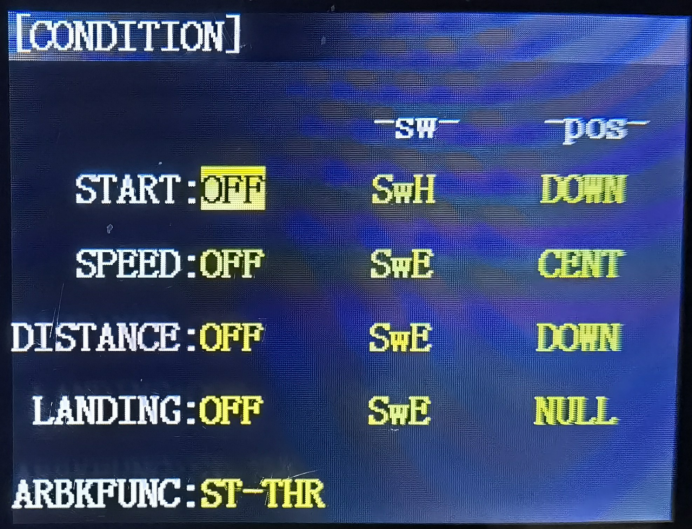
2. Into ADVANCE MENU—select CONDITION menu
If you have interchanged the SWH and SWF, you have to pay attention to the setting of SWH is actually for the SWF.
START: OFF | -sw-: SwH | -pos-: DOWN |
SPEED: OFF | -sw-: SwE | -pos-: CENT |
DISTANCE: OFF | -sw-: SwE | -pos-: DOWN |
LANDING: OFF | -sw-: SwE | -pos-: NULL |
Check the setting success or not:
① Hook the SwH; the START: OFF turns to START: ON
Release the SWH, the START: ON turns to START: OFF
② Push the SwE to the UP position. The SPEED is OFF.
Push the SwE to the CENT position. The SPEED is ON.
Push the SwE to the DOWN position. The SPEED is ON.

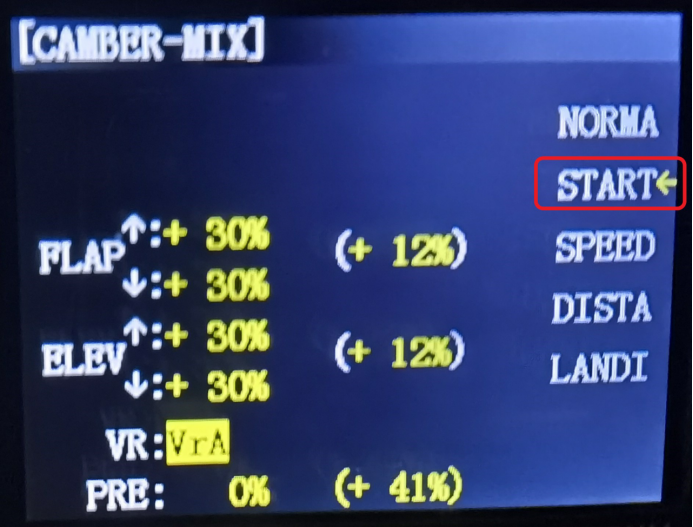
3. Into ADVANCE MENU—select CAMBER-MIX menu
Set up the parameters of FLAP and ELEV in NORMA mode
① Cursor blinks alongside NORMA
② Select VR: VrD (the slider on the top right corner of the backside)
③ Move the VrD to select the data of the FLAP and ELEV. Clockwise or anticlockwise rotate the Dial Switch will change the data and select box. Press PUSH to save the setting. The data set will depend on your plane.


Set up the parameters of FLAP and ELEV in START mode
① Press SwH. Cursor blinks alongside START. Please keep pressing SwH until the parameters of START setting finish.
② Select VR: VrA (the slider on the top left corner of transmitter)
③ Move the VrA to select the data of the FLAP and ELEV. Clockwise or anticlockwise rotate the Dial Switch will change the data and select box. Press PUSH to save the setting. The data will set depending on your plane.

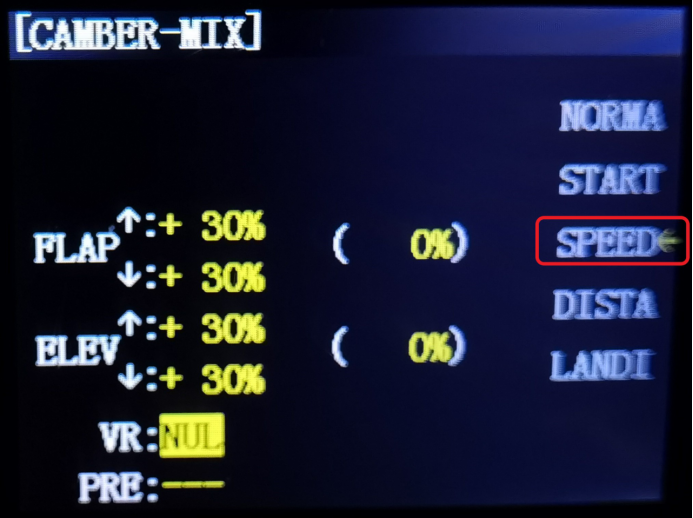
Set up the parameters of FLAP and ELEV in SPEED mode
① Push the SwE to the center position. Cursor blinks alongside SPEED.
② Select VR: VrA (the slider on the top left corner of transmitter)
③ Move the VrA to select the data of the FLAP and ELEV. Clockwise or anticlockwise rotate the Dial Switch will change the data and select box. Press PUSH to save the setting. The data will set depending on your plane.

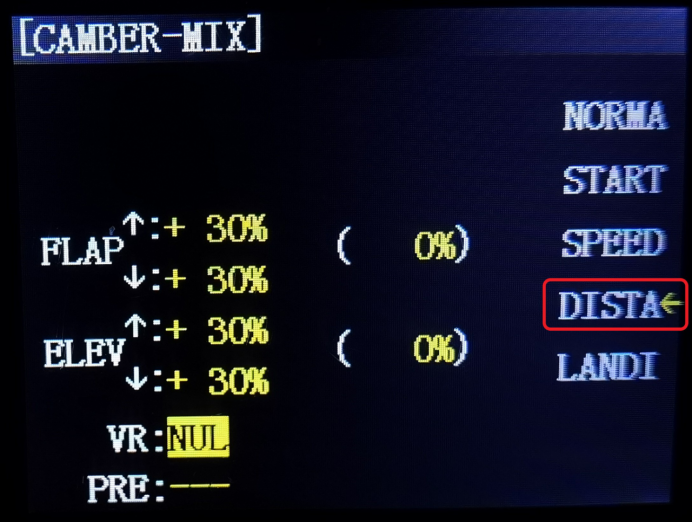
Set up the parameters of FLAP and ELEV in DISTA mode
① Push the SwE to the bottom position. Cursor blinks alongside DISTA
② Select VR: VrA (the slider on the top left corner of transmitter)
③ Move the VrA to select the data of the FLAP and ELEV. Clockwise or anticlockwise rotate the Dial Switch will change the data and select box. Press PUSH to save the setting. The data will set depending on your plane.

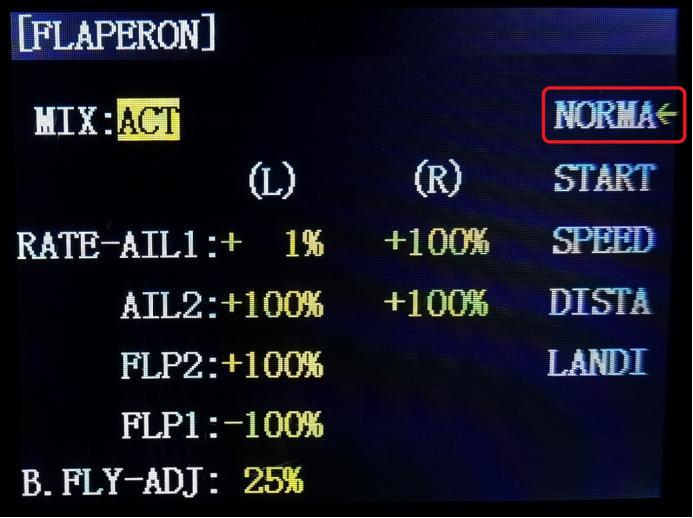
4. Into ADVANCE MENU—select FLAPERON menu
Set up the parameters of AIL and FLAP in NORMA mode
① Change MIX: INH to MIX: ACT
② Put the SwE to the top position. Cursor blinks alongside NORMA. Clockwise or anticlockwise rotate the Dial Switch to the select box to RATE-AIL1, AIL2, FLP2, FLP1, and then set up the data you need.
When the select box to the RATE-AIL1/AIL2, push the aileron stick to the left or right to set up the data of the aileron. Press PUSH to save the setting. The data will be set depending on your plane.

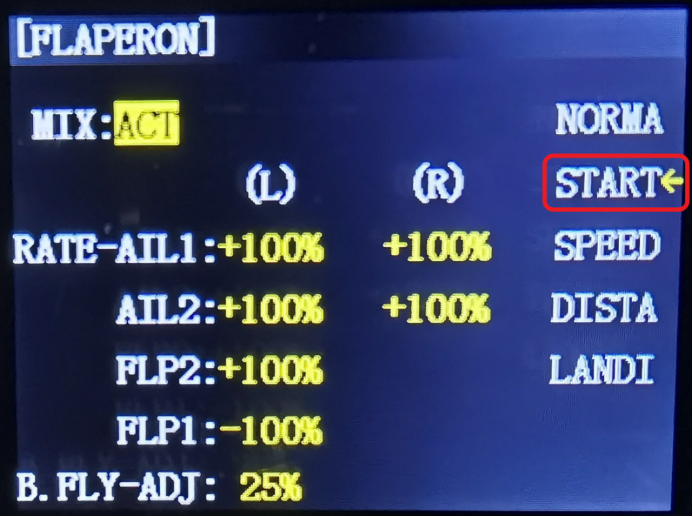
Set up the parameters of AIL and FLAP in START mode
① Press SwH. Cursor blinks alongside START. Please keep pressing SwH until the parameters of the START setting finish.
② Clockwise or anticlockwise rotate the Dial Switch to the select box to the RATE-AIL1/AIL2/FLP2/FLP1, and then set up the data you need.
When the select box to the RATE-AIL1/AIL2, push the aileron stick to the left or right to set up the data of the aileron. Press PUSH to save the setting. The data will be set depending on your plane.

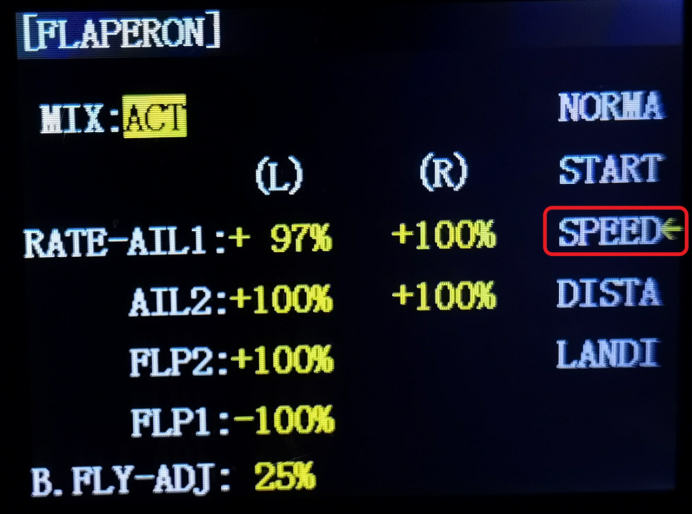
Set up the parameters of AIL and FLAP in SPEED mode
① Push the SwE to the center position, cursor blinks alongside SPEED
② Clockwise or anticlockwise rotate the Dial Switch to the select box to the RATE-AIL1/AIL2/FLP2/FLP1, and then set up the data you need.
When the select box to the RATE-AIL1/AIL2, push the aileron stick to the left or right to set up the data of the aileron. Press PUSH to save the setting. The data will be set depending on your plane.

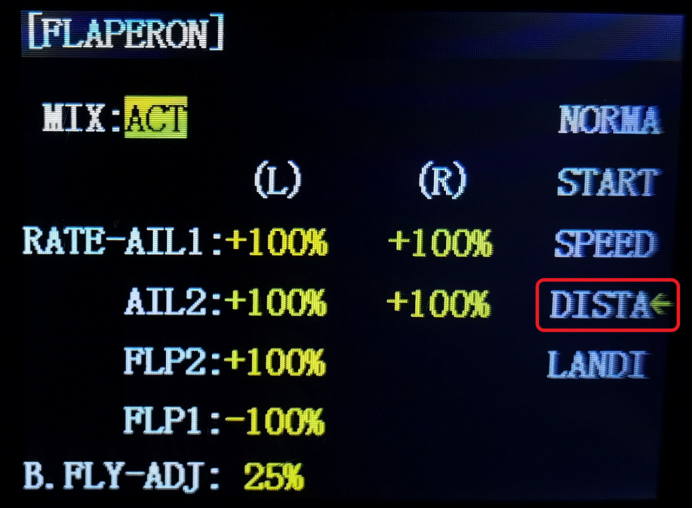
Set up the parameters of AIL and FLAP in DISTA mode
① push the SwE to the bottom position, cursor blinks alongside DISTA
② Clockwise or anticlockwise rotate the Dial Switch to the select box to the RATE-AIL1/AIL2/FLP2/FLP1, and then set up the data you need.
When the select box to the RATE-AIL1/AIL2, push the aileron stick to the left or right to set up the data of the aileron. Press PUSH to save the setting. The data will be set depending on your plane.

5. Into ADVANCE MENU—select BUTTERFLY menu
① Setup the MIX: INH to MIX: OFF, and then select the switch
SW: SwB
: UP(when move SwB to the top position)
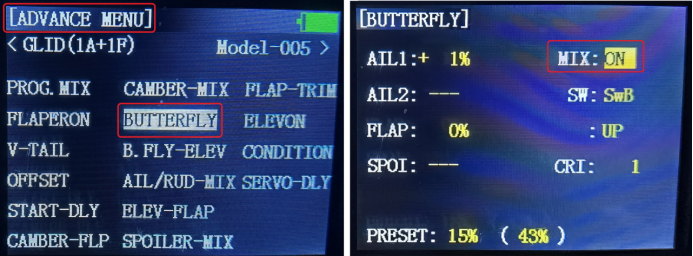

② Clockwise or anticlockwise rotate the Dial Switch to the select box to the AIL1/AIL2/FLP2/FLAP/SPOI or change the data, press PUSH to save the setting. The data will be set depending on your plane.
6. into ADVANCE MENU—select PROG. MIX menu
Choose the first programmable mix menu of -normal-
① Change MIX: INH to MIX: ON
Set up the parameters as below:
MASTER: CH3 SW: SwA
SLAVE: CH2 POSI: UP (When push SwA to the top position, the MIX will show ON)
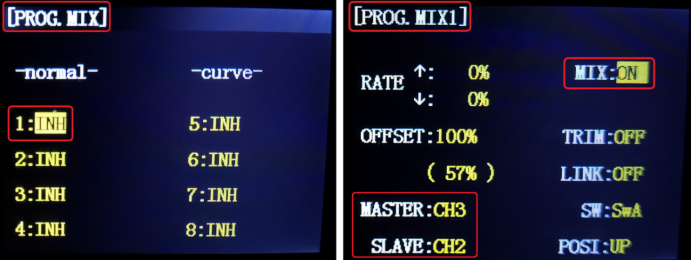

② Set up the RATE
Clockwise or anticlockwise rotate the Dial Switch to the select box to the RATE, choose the ↑ or ↓ by moving the throttle stick, clockwise or anticlockwise rotate the Dial Switch again to change the data, and press PUSH to save the setting. The data will be set depending on your plane.
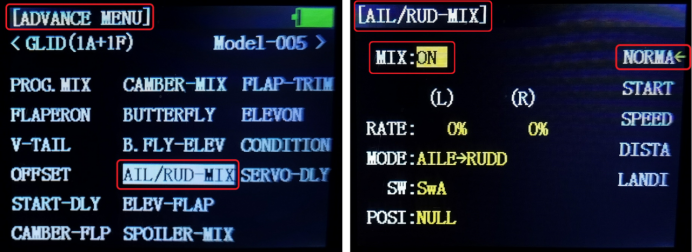
7. into ADVANCE MENU—select AIL/RUD-MIX menu
The settings of NORMA/START/SPEED are the same, the settings as shown below.
① Change the MIX: INH to MIX: ON
Set up the SW: SwD
The other parameters keep the default, do not need to setting
Change the NORMA mode to START mode by pressing or releasing the SWH, put the SWE to the center position to select the SPEED mode.

DISTA mode setting
① Change the MIX: INH to MIX: ON
Set up the SW: SwD
② Set up the RATE
Push the SwE to the bottom position, cursor blinks alongside DISTA, clockwise or anticlockwise rotate the Dial Switch to make the select box to the RATE, push the aileron stick to the left or right to setup the data of RATE, clockwise or anticlockwise rotate the Dial Switch again to change the data, press PUSH to save the setting, the data will be setting depends on your plane.
So far, all the parameter settings are finished.